Windows Movie Maker is primarily designed for movie editing, but we are going to show you a small and interesting technique to create really nice audio visuals from your photographs.
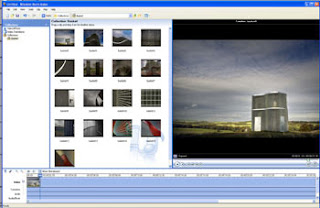
The program is accessed from the Windows Start menu's Accessories folder and when opened brings up a window with an area to drag and drop picture, video or music files which can be grouped in collections. The panel to the right which shows the work in progress and a strip below where you drag your images or videos and arrange them.
Right, so lets get started!
Step 1
Think of a theme. Mine is going to be Basket #7. Oxley Bank a small building like sculpture situated on a hill at the Yorkshire Sculpture Park created by Winter/Hörbelt.
I found this fascinating item with great shapes and took a series of pictures from inside and outside to show the fantastic wire frame sculpture at, hopefully, its best.
Step 2
Right click on the Collections icon on the far left panel to creates a sub menu collection, I'm calling mine Basket. Then make sure this collection is selected. If you cannot see the Collections view select Collections at the top next to Tasks.
Step 3
Go to File>Import into Collections (Ctrl I) and locate the pictures on your computer's hard drive. I like to prepared mine in advance, doing any necessary cropping and editing in Photoshop and place them in a folder. You can have any number of pictures, but I always found somewhere between 10 and 20 is enough to prevent your viewers from being bored (and it keeps the show short and download light), in this one I'm going to use 16.
Click on the first file icon and, while holding down the shift key, click on the last file to select all the files you want to import. Then, click import.
Thumbnails of all the pictures will appear in the Collection window. It doesn't matter what order they are in or how big the originals were.
Step 4

Click on the thumbnail of the picture that you want to appear first in your AV and drag it to the video strip at the bottom. Click on "Show Timeline" to view the time line if it's not already showing.
Then select your second picture, and drag that to the video strip. You will see that it butts up next to the first image. Repeat this with all the images in the order you want them to run. Now you will have a strip of 16 images and if you click on any one of them that image will appear on the panel on the right.
You can drag the left hand side of that panel left to increase the preview size or to the right to decrease the size, allowing more space for your collection thumbnails.
Step 5
On the base of the preview panel (right) there is a set of video player controls, click the rewind button to take your slide show back to the start, or you could click and drag the marker (blue line) back to the start of the images selected. If you now click the play button on the right hand panel you will see a basic slide show of all your images. Each has a default duration of 5 seconds. If you want a larger or shorter duration, go to Tools>Options and click on the Advance tab and set the desired number of seconds in the picture duration box. This has to be done before you drag the images from the collection to the video strip.
If you want a different duration once you've dragged them, you can click on the thumbnail in the video strip, then hover over the edge until you see the cursor change then drag it left to shorten the duration or right to lengthen it, you will see a red back and forwards arrow to help. The advantage of doing this is that it gives you the option of variation throughout the show.
Step 6

Currently the show just snaps from one frame to another but now its time to add a snazzy transition between each frame.
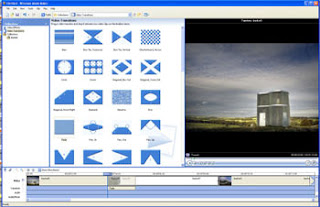
Go to Tools>Video Transitions and the collections window is replaced with a Transitions window. Here you will see a selection of icons demonstrating the type of effect you will can apply between frames. These range from simple fades and dissolves to page curls and sweeps through to more complex effects. We will go for the simple fade.
Click on the Fade icon and drag it roughly between two of your images on the video line. This will snap in between and a fade will automatically be added. Repeat this process adding a transition between each shot. If you decide you dont like one of the added effects just right click the white mark under the timeline to delete it.
Step 7
Next thing to do is add an audio soundtrack, if you are fortunate enough to be a musician you can add your own music, if not you will either need to buy some royalty free music or find a site that has some free downloads.
I've used Nocturnal Vigil (Pt.2) by Brannan Lane & Tom Larson BrannanLane.com from http://music.download.com website. Do a Google search for free mp3 downloads to find other websites that provide royalty free music.
Step 8
Once you have downloaded your music drag it to the collections window and then down to the audio/music strip at the bottom of window. Don't worry about it being longer than your slide collection we will trim it later.
Step 9
You could, at this stage, add video effects from the tools menu, these include aged film, pixellated, sepia tone and water colour which basically put a filter over the photograph. I dont personally like these as I prefer to do any artistic effect in my image-editing program before importing into the program. If you do decide to add them, but later decide you want to remove them, you will need to increase the size of the timeline using the plus ( ) icon enough to see video effect icon on the timeline (between slides), right click to delete.
Step 10
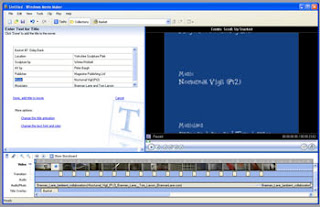
Now to add a show title. Click Tools > Title and Credits and choose whether to add a title at the beginning or in the timeline. I'm going to add mine to the first frame so I click on the first frame in the bottom strip and on "Add title on the selected clip". Enter the text you want to use. This should be the title of your show and maybe your name. You can set the way the text displays by clicking on the change the title animation link and also edit the font and its colour. When done click okay. Preview this using the play button in the right side window and adjust the length of the first frame and the position of the title in the bottom strip so that it all moves through smoothly.
Step 11

Click Tools > Title and Credits again and this time Add credits at the end. Now add your credits. I put the title again, the location, the producer, and the music and musians. It's like having a mini film credit list. Put the title in the top panel and then split the section below putting the whats in the left and the whos in the right. Click done. This will add a blue screen at the end with fancy scrolling credits.
Step 12
Last thing to do is cut the music strip by clicking the mouse at the end on the time line and click on the trim icon below the preview window on the right or from the menu Clip > Split (Ctrl L) and add a fade by right clicking on the Audio/Music strip at the bottom and choose Fade Out. Click on the unused end piece and press the delete button to remove it.
Step 13

Play the movie by clicking on the arrow in the right hand preview and check the music works, the fades look good and the durations of each clip are ample. If not make more adjustments. If they are click on File > Save Movie File (Ctrl P) and choose a suitable playback format. I used High Quality Video (large) from the other settings drop down.which creates a 640x480pixel display with 25 frames per second.
Well I hope this tutorial makes creating Audio Visual shows an easy option in a program you may never have realised you had. Please rate the tutorial using our scoring system, also add a comment to say how easy or hard you found it to do and don't forget to submit your efforts to our download section.
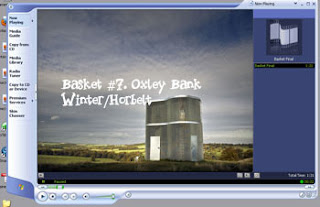
The finished product which took about 15mins to create is below. Enjoy.


No comments:
Post a Comment