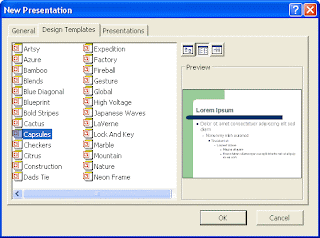
A Design Template is a pre-made slide or set of slides that you get when you click File > New in PowerPoint. For example, if you are designing something for the office, then your employer may have a Logo that needs to be added to each presentation. Instead of adding the Logo to each slide, you can set up a Design Template, and add the Logo to that. The template will then be available from the dialogue box when you click File > New.
Or, if you have Power 2003, when you click From Design Template in the Task Pane. You'll then see the available designs appear:
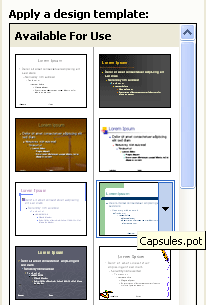
What you're going to do now is to create your own Design Template that will appear on the dialogue box or on the Task Pane. But to get an idea of what you'll be doing, select any of the Design Templates, and click OK.
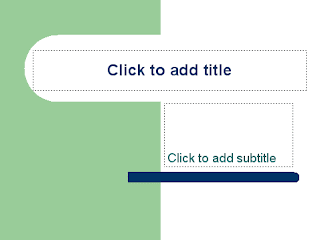
When you do, you'll see a New Slide dialogue box. Select the first one (Title slide). PowerPoint will give you the following new slide:
Insert another slide by clicking Insert > New Slide from the PowerPoint menu at the top. This time, select the Bulleted list. You'll then see the following slide appear:
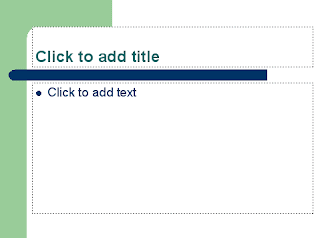
The point about all this is that you don't have to do any work formatting the background, the fonts, or the text box positions. All that has been taken care of in the Design Template....
You've already created a Master Slide in a previous section of this course, so we won't go through everything again. But if you have a presentation open in PowerPoint, click File > Close. Then click File > New. In PowerPoint 2003, select Blank Presentation from the Task Pane on the right hand side. You'll get a slide with a bulleted list. Locate the blank slide in the Task Pane, and click the arrow:
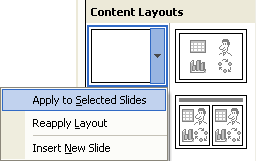
From the menu, select Apply to Selected Slides, as in the image above.
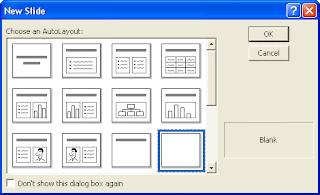
In PowerPoint 2000, you'll see the New Presentation screen again. Click on the General tab, then select Blank Presentation. Click OK, and you should see the New Slide dialogue box appear. Select the Blank slide, as in the image below:
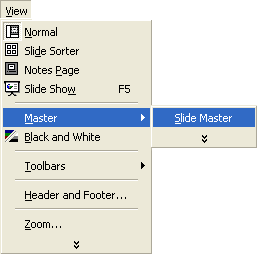
For both 2000 and 2003 users, once you have a blank slide, click View > Master > Slide Master from the menu bar at the top of PowerPoint:
You will be taken to the Master Slide view, and the slide should look like this:
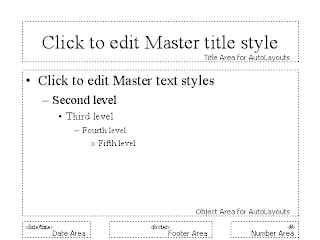
From here, you can redesign any of the areas you see above. First, we'll add a background.
Click Format from the menu at the top of PowerPoint. From the Format menu, select Background. You'll see this small dialogue box appear:
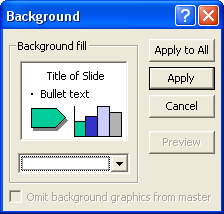
Click the black arrow on the dropdown list, and select Fill Effects:
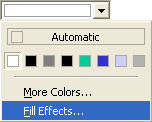
From the Fill Effects dialogue box that appears, click the Picture tab on the end. Browse for a picture on your computer. The one we're going to insert is amongst the file that you downloaded at the start of the book, in the folder called backgrounds.
Your dialogue box will then look like this:
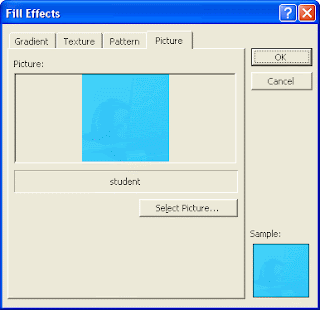
Click OK. When you get back to the small Background dialogue box, click Apply. Your Master Slide will then look like this:
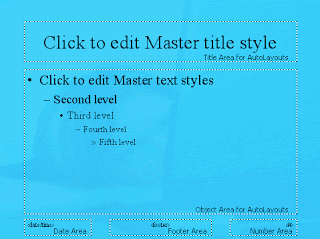
With the background in place, we can format the other areas. Highlight the text in the Title area "Click to edit Master title style". Change the Font to Arial, and the size to 36. Click Format > Font from the menu bar, and select a colour for the Font. We went for a light blue colour:
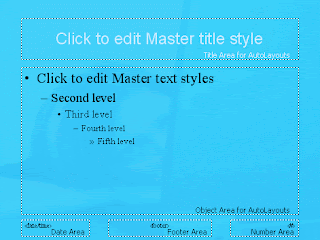
Format the rest of the AutoLayout areas in the same way. Don't forget the Footer area at the bottom. Format the slide number and date, if you prefer:
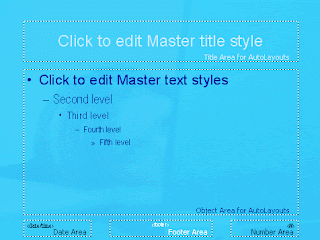
We went with a dark blue colour in the main text area, and Arial for the font. For the footer, the font was again Arial, but size 12 and in white.
If you want, you can resize and move any of the text areas. We did this before when setting up the Master Slide, so won't go through it again.
When you're happy with your Master Slide, click Close on the small dialogue box. Or click View > Normal from the menu bar at the top.
When you get back to the main screen, you should see the formerly white blank canvas you started with change to that of the background you added for the Master Slide.....
Now that you have formatted the Master Slide, you can add a Title slide. A lot of the time, you'd want this to be different from the Master.
Click Insert > New Slide from the menu bars at the top of PowerPoint. Insert a new Title slide:
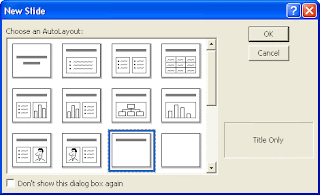
PowerPoint 2000
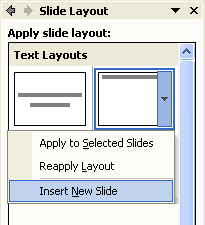
PowerPoint 2003
You should then have two slides in PowerPoint. However, the Title slide will be the second slide, and we want this to be the first, because it will be the opening screen.
To move the Title slide to the start, click View > Slide Sorter from the menu bar. In Slide Sorter view, click on slide 2. Hold down your left mouse button and drag it to before slide 1. Then click View > Normal to get back to the main PowerPoint screen. In Outline View on the left, click on Slide 1. This should now be your Title slide. Click on Slide 2 and it should be blank, with just the background. Here's what your slide 1 should look like:
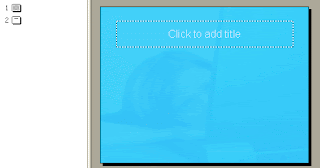
And here's the second slide:
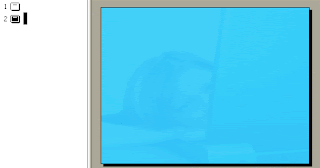
So our Design template has two slides in it so far - a Tile slide, and a Master Slide. (Although the Master Slide is blank in our presentation, when you save it as a Design Template, it will retain all the formatting you did in Master Slide view.)
We can now save this as a Design Template. From the PowerPoint menu bar at the top, click File > Saves As. From the Save As box, select Design Template from Save as type:
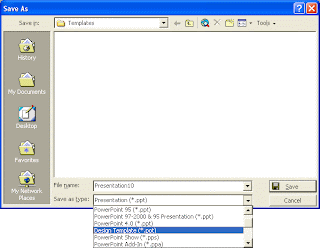
Type a name for your template, and click Save.
Once your design template is saved, you can create a new PowerPoint Presentation with all the formatting already in place. To test it out, click File > New. Your presentation will be on the General tab in PowerPoint 2000, and on the Task Pane in PowerPoint 2003.
In the image below (2000), we have saved the design template with the name Student1 (notice that the file ending is .pot):
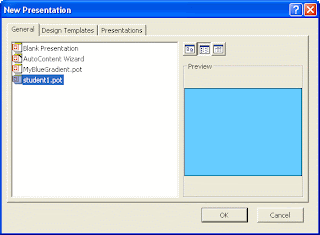
Click OK and your template will be loaded.
Creating a Design Template can save you a lot of time and effort, especially if you're creating PowerPoint presentations for work.
29 August 2008
27 August 2008
How to Build Your Own Bike
Once you have gotten the cycling fever, you might want to build your bicycle from start to finish. This is a fun, but can be expensive process depending on your taste and budget. There are custom builders who can take your measurements and preferences to build your bicycle, but it is not half as fun or satisfying as building your bicycle. This article will detail a process for selecting the components and assembling them in to a custom built by you bicycle
.................................................
Things You’ll Need:
* Bicycle frame
* Component group
* Saddle, seat post, handlebars, pedals, bar tape
* Wheels and tires
* Bicycle Computer/heart rate monitor
* Bicycle specific tools if you assemble
Assembling the parts:
Deciding to build your own bicycle is just the first decision you will make. There are dozens of decisions you will have to make about the frame, style of bicycle, components and fit. You can take a couple of initial routes at this point. You can do the research the research into the components, which in some cases is part of the fun. The other path is to sit down with a local bicycle dealer to seek their advice and help buying the parts. The advantage of doing the research yourself is that you are not limited to the parts or bicycles a local bicycle dealer can get for you. Most bicycle dealers carry a limited number of bicycle and part brands, but they will be able to build anything for you if you deliver them the parts. I would recommend independent research to decide what's best for you and trips to multiple bicycle shops to check out parts.
Start with the frame. What material are you going to use? Going the custom route means you want something that is distinctive usually, which means carbon fiber or titanium. Carbon fiber is lighter and allows for more design options. Titanium is usually stiffer and can mean heavier, but not by a lot. Local bicycle publications can be a good place to shop for a frame. Usually someone selling a frame only is trading up themselves so you can get something more exotic for a good price. There are also online retailers that will sell you a frame only or a frame and the component parts you want. Make sure you have the right to return a used frame if you go that route and that you inspect if very carefully before accepting it.
Next is the component or build kit. There are three primary makers of bicycle components: Shimano, Campagnolo and SRAM. All have their characteristics that make their products unique and have a range of products to fit any budget. This is an area where new parts are essential. The difference in new vs. used is usually not a great deal of money, so new is the way to go. There are links at the bottom for each of the component manufacturers so you can start your research. The parts you will get from a component group are: both dérailleurs, brakes, shifters or controllers, crankset (crank and bottom bracket) and chain.
Wheels are next. It you have a budget of "X", then wheels should be nearly 1/2 of that budget because they make the biggest difference in performance other than overall weight and the frame. The type of wheels you select are dependent on a few factors. First, which component group did you select? Shimano and SRAM use one kind of freewheel-rear wheel and Campagnolo uses another-this is due to the hub set up. There are also some brands that are exclusive to that set up and there are some manufacturers that will make both types, but it is a factor. Next factor is what type of riding are you going to be doing? Triathlons could mean one type of wheel set or lots of climbing could be another kind of wheel set. Aero wheels are popular now and have higher performance characteristics, but also could be significantly more expensive. What material would you like to have in the wheels. Carbon fiber or titanium will be lighter but more expensive. Carbon fiber wheels also will require carbon fiber safe brake pads. You also need to decide whether you want to use tubular or clincher wheels. Tubular roll faster, but require a professional, glue and time to change the tires. Clinchers are in general easily changed if you have a flat.
Tires are also part of the wheel selection process. Spend more money on tires and less on tubes. There is very little difference in tubes, but significant differences in tires. Is rolling speed or grip more important or a combination of both? The tires need to match the wheels with regard to clinchers or tubular.
Selecting a saddle is purely a matter of `fit. Some professional cyclists use the same saddle for years and refuse to change. As one columnist put it, it's you rear end so you'll know what is best. Try at least three saddles with different shapes or geometry to find the one that's right for you. You will also need a seat post that is compatible with your frame.
Clipless pedals are the way to go, but there are different shapes and styles which will also determine the cleats you need.
The last components you need are handlebars, handlebar tape and pedals. Handlebars with curved ends or drops, have the same basic shapes, but might have slight variances on grip.
Assembling your bicycle:
Assuming you decide to build the bicycle yourself, you will bicycle specific tools and a stand. The tools you will need to have at a minimum are: a complete set of allen wrenches, flat head and philips screw drivers, pedal wrench, cassette locking tool and chain whip, chain breaker, crank puller and bottom bracket tool, as well as a cable puller and cable cutting tool.
The easiest place to start is to install the tires and tubes on the wheels. Next put a small amount of grease on the rear wheel or free hub where it meets the cassette and install the cassette. Be careful to make sure all of the spacers and components are installed as intended.. Next use the cassette locking tool to secure it to the hub.
Next attach the seat post and saddle to the frame. You will need allen wrenches to accomplish this. You have the option of cutting the seat post to remove weight, but only to a certain point to ensure it will stay secure.
Secure the handle bar to the stem and the stem to the steering tube attached to the fork. If the head tube does not have a head set you will need to install one. You may need to install spacers to raise the handlebars to a comfortable height. The steering tube is another part that can be cut to the a right size if you wish.
Attach the shifters or controllers to the handlebars. You will use an allen wrench to snug them to the handlebars. You will probably want to adjust them slightly later in the process. The exact location is a matter of personal fit and comfort.
Attach the brakes through the frame. There is a front brake set and rear brake set. Brakes are secured to the frame with allen wrenches. Once installed move the adjustment lever all the way down.
Next install the crank and bottom bracket. There is are specific tools for this. First install the bottom bracket using a bottom bracket wrench. There are different types or wrenches depending on the type of bottom bracket and whether or not the bottom bracket has external cups or not. Next install the crankset. Again, there are specific tools that are needed depending on the crankset.
Next install the derailleurs. This is largely a matter of attaching them to the frame. They will need to be adjusted later, but install them on the frame.
Measure and cut the chain after running it through the deraileurs and chain ring. The best way to measure the chain is to use the large chain ring and the largest cassette cog then add 2-3 additional links. You will need a chain breaker to cut the excess chain links and finish the installation. There are articles on how to accomplish this on eHow.
Install the brake cables and then the derailleur cables. The controllers and and brakes will come with detailed instructions on the correct methods to install the cables. You will next want to adjust the high and low limit screws on the derailleurs to help ensure the are working properly.
The last step is to adjust the fit and tune the controls to make sure everything is comfortable and works as intended.There are bicycle fit articles on eHow to help you with this process.
Install the cables next start with the brake cables. Your brake and shifters will give you detailed instructions on the correct method.This is also the case with the derailleur cables. After you get them installed you will want to set the upper and lower limit screws to dial in more precise shifts.
26 August 2008
How To Make Your Own Clock
How to make a country clock. The supplies you will need and the tools needed:
This is a step by step guide on how to make yourself a country clock. It requires very little work and is very easy to complete. You can easily do it in a few spare minutes. Here is what you will need to get started.
1. You will need a piece of a log with the bark still on. It will need to be dried. The wood needs to be 3/4" thick and at least 10" in diameter. These can also be purchased at a hobby or craft store.
2. You will need a drill with a medium size drill bit.
3. A can of wood sealer or varnish.
4. A clock dial, which can be purchased for under $5.00 at a hobby shop.
5. A set of clock numbers.
6. A metal picture hanger to hang the clock on the wall.
7. A piece of sandpaper.
8. A small phillips screw driver.
9. A small wrench to fit the clock dial.
10. A ruler.
11. Wood glue.
Now that you have everything you need, let us get started on the clock.
1. Drill a hole in the center of the wood.
2. Use the sandpaper to sand down the front of the wood to make it smooth.
3. Put the wood sealer or varnish on the wood that you have sanded. Let it dry overnight. This will give the wood a very shiny finish.
4. Insert the clock dial through the back of the clock with the stem coming out of the front. Use the wrench to tighten up the dial.
5. Use the glue to stick the numbers on the clock face. Make sure they are straight by using the ruler.
6. Take the hanger and screw it into the back of the clock on the top. This gives you something to hang it on the wall with.
You now have your country clock complete. It will make a nice addition to your home. The total cost you have in your clock should be around $10.00.
Cookies Recipe from the Planet Mars
These very tasty red cookies come from a special, long-forgotten and very ancient Martian recipe that were brought to earth from millions of miles away on a wayward asteroid. The recipe is also millions of years old.
You, however, can make it today in your very own home on the planet closest to Mars, earth!
* 1/2 pound butter (use lightly salted butter)
* 1 cup sugar
* 2 large eggs
* 1-1/2 tablespoons of water
* 1 teaspoon vanilla
* 3-1/2 cups flour
* 1/2 teaspoon baking powder
* 1/2 teaspoon baking soda
* Rolling pin
* 2 bowls
* Cookie cutters to make fun shapes
* Lightly greased cookie sheet
* Red icing or frosting and red sprinkles
1- You’re going to mix some ingredients separately, so get two bowls ready. In one bowl (the larger one if you have two different sizes), beat the butter and sugar together until creamy and fluffy. Add the eggs one at a time. Then blend in the water and vanilla.
2- In the second bowl, mix the flour, baking powder and baking soda. Once these three ingredients are all mixed together, stir them into the contents of the first bowl, and make sure the ingredients are well blended.
3- Cover the bowl and put it in the fridge to chill the mixture.
4- Pre-heat your oven to 350 degrees (make sure to have an adult help you!)
5- Roll out the dough and use the cookie cutters to make fun shapes, like little Martians.
6- Grease a baking sheet lightly, and place the cookie dough at least 1″ apart on the sheet.
7- Baking time depends on the size of the cookies. Bake them for 5-7 minutes, but don’t let them brown!
8- Let them cool, decorate with icing and sprinkles, serve, and eat!
Holiday Cookies Recipe
Holidays season is a time of sharing, so bake some colorful holiday cookies for your friends and family.
This recipe uses ingredients found in many kitchens. Choose your own cookie cutters to make the shapes you want.
You might try to save some cookies for yourself too - if others don’t gobble them up first!
* 1/3 cup sugar
* 1 egg
* 2/3 cup honey
* 1 tsp lemon flavoring
* 1/3 cup shortening
* 2 3/4 cups flour
* 1 tsp soda
* 1 tsp salt
* Rolling pin
* 2 bowls
* Cookie cutters to make fun shapes
* Red and green sprinkles, or other festive edible decorations
* White icing or frosting
1- You’re going to mix some ingredients separately, so get two bowls ready. In one bowl (the larger one if you have two different sizes), mix up the sugar, egg, shortening, honey and lemon flavor. Make sure it’s mixed really well!
2- In the second bowl, mix the flour, soda and salt. Once these three ingredients are all mixed together, stir them into the contents of the first bowl, and make sure the ingredients are well blended.
3- Cover the bowl and put it in the fridge to chill the mixture.
4- Pre-heat your oven to 375 degrees (make sure to have an adult help you!)
5- Sprinkle some flour on a flat surface so the dough won’t stick, and roll out the dough so it’s about 1/4″ thick.
6- Use the cookie cutters to make fun shapes, like Christmas trees or snowmen.
7- Grease a baking sheet lightly, and place the cookie dough at least 1″ apart on the sheet.
8- Bake for 8-9 minutes, or until they just start getting slightly brown on top.
9- Let them cool, decorate with icing and sprinkles, serve, and eat!
How to Make Your Own Ice Cream
Ice cream is one of the oldest, most beloved desserts and sweets, for children and adults alike. Centuries ago, kings and queens called for ice to be brought from hundreds of miles away to help make and keep ice cream. You might think that you need ice boxes or other machines to make ice cream, but that is not the case.
Try this cool and simple recipe to make your own ice cream. Your taste buds will thank you!
* 1 tablespoon sugar
* 1/2 cup milk
* 1/4 teaspoon vanilla
* 6 tablespoons rock salt (or regular salt if you can’t find rock salt)
* 1 gallon size Ziploc bag
* 1 pint size Ziploc bag
* Ice
Fill the gallon size bag (the larger bag) with ice about half way and add the salt and seal it.
Mix the sugar, milk and vanilla in the small pint sized bag and seal it.
Open up the large bag and put the small bag inside and seal the large bag again.
Shake the bag and you’ll see your mixture in the small bag turn into ice cream! (It will take about 5 minutes of shaking)
Open up the small bag and enjoy!!
How-To : Make your own Pirate Radio Station with an iPod
This was going to be "How-To increase the range of your iTrip mini". But after playing around with the new iTrip mini, the FM broadcasting accessory for the iPod (our review here) our little minds got working on some ideas. We thought we might be able to make the range of Griffin's iTrip mini a little better if took it apart and exposed the antenna, turns out we could. And then we thought, hey- we could use a couple iPods to broadcast something we wanted to get out there, perhaps not "should" that is, but could. So that was our motivation, and here's the How-To.
Ingredients:
1 iPod mini
1 iTrip mini
Optional: Addition iPods, iTalks and iTrips
Getting Started
First, to become your own pirate broadcast station you'll need to increase the range and signal of your iTrip mini. Turns out, there is an antennae built inside the iTrip mini. All you need to do is remove the top sticker-like protection which hides the antennae and then using tweezers or your fingernail, pull the antennae out. We've found a 20% to 30% increase of range on average. This likely voids the warranty, so there, we said it.
Next up, if you're using the iTrip mini, then you know that you can install all the stations on the dial to broadcast on. At first we we're really sure we'd ever use them, but now we have good reason. So make sure you've installed all the stations, on the go you might need them to switch to. Remember, the iTrip is a FM broadcasting device, intended to broadcast 10 to 30 feet to a FM radio.
Next, choose your broadcast, it can be any song or a spoken word MP3, don't worry we have a few suggestions. A lot depends on the situation you're in.
Pirate Broadcasts
We usually keep a couple tracks of silence ready to go, ever get stuck at a stop light for like 10 minutes and the dude in the next car is blasting the radio? With the super easy iPod interface you can quickly get to the station he's on and send over whatever you want, a couple gentle ocean waves or birds usually works out great.
If you've ever gone to the Gym, or starred in to one from the outside- you'll notice the TVs are muted and set to broadcast on specific FM frequencies, folks then tune in their radio headsets to whatever station to listen to the audio as they exercise. Now we're not suggesting you go around and broadcast over CNN or anything, but we think broadcasting "Aliens have landed today, the President and UN will be making an announcement immediately" could be quite fun. We'll be trying this out with our gym pals who are usually up for a good gag.
There are other times where you simply need to broadcast back. Let's say you're at the park, enjoying a nice quiet day with your family- then comes along someone blasting the radio. We've found broadcasting a silent track tends to work nicely, sure you need to be within 30 to 40 feet, but no one will even suspect that their FM broadcast is getting usurped by you.
Advanced Pirate Radio Broadcasting techniques
We've also discovered another fun example. If you use the iTalk, Griffin's voice recorder accessory with 2g/3g iPod you can record your pirate broadcast on the fly, pop in the iTrip and start broadcasting. Usually pretending to be an omnipotent being and asking folks to build a water proof car, drive across the English Channel with two of every gadget gets some interesting reactions.
Now, if you really get in to this- you could easily increase the range even more, google around for ways to do this- we're working on a few and will let you know too. You can additionally use multiple iPods, when you're broadcasting something like a silent track, you and a pal can cover more area and really surround the FM receiver. And finally, there are also a lot of other things which use FM that you can discover and broadcast to, happy hunting.
This concludes our broadcast.
Ingredients:
1 iPod mini
1 iTrip mini
Optional: Addition iPods, iTalks and iTrips
Getting Started
First, to become your own pirate broadcast station you'll need to increase the range and signal of your iTrip mini. Turns out, there is an antennae built inside the iTrip mini. All you need to do is remove the top sticker-like protection which hides the antennae and then using tweezers or your fingernail, pull the antennae out. We've found a 20% to 30% increase of range on average. This likely voids the warranty, so there, we said it.
Next up, if you're using the iTrip mini, then you know that you can install all the stations on the dial to broadcast on. At first we we're really sure we'd ever use them, but now we have good reason. So make sure you've installed all the stations, on the go you might need them to switch to. Remember, the iTrip is a FM broadcasting device, intended to broadcast 10 to 30 feet to a FM radio.
Next, choose your broadcast, it can be any song or a spoken word MP3, don't worry we have a few suggestions. A lot depends on the situation you're in.
Pirate Broadcasts
We usually keep a couple tracks of silence ready to go, ever get stuck at a stop light for like 10 minutes and the dude in the next car is blasting the radio? With the super easy iPod interface you can quickly get to the station he's on and send over whatever you want, a couple gentle ocean waves or birds usually works out great.
If you've ever gone to the Gym, or starred in to one from the outside- you'll notice the TVs are muted and set to broadcast on specific FM frequencies, folks then tune in their radio headsets to whatever station to listen to the audio as they exercise. Now we're not suggesting you go around and broadcast over CNN or anything, but we think broadcasting "Aliens have landed today, the President and UN will be making an announcement immediately" could be quite fun. We'll be trying this out with our gym pals who are usually up for a good gag.
There are other times where you simply need to broadcast back. Let's say you're at the park, enjoying a nice quiet day with your family- then comes along someone blasting the radio. We've found broadcasting a silent track tends to work nicely, sure you need to be within 30 to 40 feet, but no one will even suspect that their FM broadcast is getting usurped by you.
Advanced Pirate Radio Broadcasting techniques
We've also discovered another fun example. If you use the iTalk, Griffin's voice recorder accessory with 2g/3g iPod you can record your pirate broadcast on the fly, pop in the iTrip and start broadcasting. Usually pretending to be an omnipotent being and asking folks to build a water proof car, drive across the English Channel with two of every gadget gets some interesting reactions.
Now, if you really get in to this- you could easily increase the range even more, google around for ways to do this- we're working on a few and will let you know too. You can additionally use multiple iPods, when you're broadcasting something like a silent track, you and a pal can cover more area and really surround the FM receiver. And finally, there are also a lot of other things which use FM that you can discover and broadcast to, happy hunting.
This concludes our broadcast.
Subscribe to:
Posts (Atom)